How to use the virtual piano
On a phone or tablet, touch a white or black key. On a computer, A S D F G H J K L and semicolon play the white notes; W E T Y U O P play the black notes. Turn labels off when you want to rely on sound instead of note names.
Can this help you find notes by ear?
Yes. Sing a short phrase, match its first pitch and decide whether each next note rises, falls or repeats. Work with two or three notes at a time. Our guide to finding notes by ear explains the complete method.
What does the listening challenge do?
The browser generates one original pitch and asks you to find the same key. It is a focused comparison, not a diagnosis of musical ability. Replay the note when needed and use the feedback to narrow your next attempt.
Is the virtual piano a replacement for an instrument?
No. It is useful for checking notes and trying short ideas when an instrument is not nearby. It cannot reproduce the touch, pedals, range or technique of an acoustic or digital piano.
How to practise with an online piano
A virtual piano is most useful when every tap has a purpose. Start by choosing one small task: locate a note, compare two pitches, copy a three-note pattern or check whether a melody moves up or down. Play slowly enough to hear the space between notes. If you press many keys without making a decision, the keyboard becomes a guessing game rather than an ear-training tool.
This keyboard covers C4 to E5, including the black keys between them. That compact range keeps every key large enough to use on a phone while still giving you a complete octave and several notes above it. The pitch label combines a note name with an octave number: C4 is middle C, and C5 is the next C above it. You do not need to memorise those numbers before you begin; they simply help you return to the same pitch.
Learn the virtual piano note layout
The white keys follow the repeating sequence C, D, E, F, G, A and B. After B, the pattern returns to C in the next octave. Black keys are named with sharps in this tool: C-sharp sits between C and D, while D-sharp sits between D and E. There is no black key between E and F or between B and C. That uneven group of two black keys followed by three is the quickest visual landmark on a piano.
Begin with C, then move one white key at a time and say each letter aloud. Reverse direction after reaching the upper C. Next, hide the labels and use the two-black-key group to find C again. This is more reliable than trying to remember the screen position of an individual key, especially because mobile and desktop layouts use different widths.
A 10-minute virtual piano ear-training routine
Spend the first two minutes playing one note, singing it softly and checking the match. For the next two minutes, play pairs of white keys. Before looking at the keyboard, say whether the second note is higher, lower or the same. During minutes five and six, choose a three-note pattern, listen once, wait for one steady beat and play it back.
Use minutes seven and eight for the listening challenge above. Replay the target when you need to, but record how many attempts you use rather than treating every miss as failure. In the final two minutes, repeat one pattern from a different starting key. If its shape remains recognisable after transposition, you are listening to the relationship between notes instead of memorising one recording.
Short, attentive sessions are usually easier to evaluate than a long sequence of random notes. Keep a simple practice note with the task, the number of pitches and the main difficulty. “Three notes; direction correct; last pitch too high” gives you a useful next step. A percentage alone does not explain what changed.
How to find a melody on the piano by ear
Choose a very short melody you can sing accurately without a recording. Hum its first pitch and search for the nearest key. Once the starting note feels stable, stop thinking about note names for a moment. Ask whether the next pitch repeats, moves by a small step or makes a larger leap. Test one nearby key in that direction, compare it with your sung version and adjust.
Work in fragments of two or three notes. When a fragment is correct, connect it to the next one. If the melody falls apart, return to the last secure note instead of restarting from the beginning every time. Our melodic dictation guide develops this listen–remember–reproduce process in more detail.
Use melodies that you create yourself, material you have permission to use or public-domain exercises whose status you have verified. The keyboard is designed for original practice and pitch checking; it does not provide copyrighted song sheets or commercial recordings.
Practising intervals and chords on the free piano
Not sure which keys belong together? Use the piano chord chart and inversion examples to check chord tones. For an ordered note sequence, the major scale guide explains how whole and half steps determine each note. Return to this keyboard to hear your answer.
To hear how changing one scale degree affects a phrase, try the natural, harmonic and melodic minor comparisons. Keep the same starting note and compare the sixth or seventh degree on this keyboard.
Use the circle of fifths guide to check key signatures and relative minors. For short original phrases with fewer pitch choices, try the note, rest and ending comparisons in our pentatonic scale practice.
Connect chords with steady timing using our piano chord progression exercises. To move a melody or accompaniment into a different key, follow the interval, chord-quality and bass checks in how to transpose music.
Use one key to explore syncopation and offbeat counting before adding melody. If you also play drums, our single-stroke, double-stroke and paradiddle guide treats hand order separately; a screen keyboard cannot assess physical stick technique.
An interval is the relationship between two pitches. Play C followed by D and listen to a small upward step. Compare that with C followed by G, which makes a wider leap. At first, classify only direction and size: up or down, close or wide. Add formal interval names after those basic contrasts are consistent.
To hear a chord, hold two or three compatible keys together. Compare C–E–G with C–E-flat–G by replacing E with the black key immediately to its left. The changed third alters the chord quality while C and G remain the same. Keep the sound level comfortable and avoid rapid repetition; the goal is to separate the layers inside the combined sound.
The browser piano offers a small, controlled workspace. For broader interval, chord, melody and rhythm exercises, use the free ear-training test as an initial check and continue structured practice in KulakApp.
Common mistakes when using a browser piano
- Watching before listening: close your eyes or look away when a partner plays a note, then make a prediction before searching.
- Changing several variables: do not increase speed, pattern length and key range in the same attempt.
- Guessing with many keys: decide higher or lower before each next press so every attempt provides information.
- Keeping labels on forever: labels teach the layout, but short label-free rounds test whether sound and position are connected.
- Using maximum volume: comfortable listening is more useful than loud playback. Set your device level before repeated practice.
Virtual piano on mobile and desktop
On mobile, rotate only if you prefer a wider keyboard; the page is designed to remain usable in portrait view. Touching a key starts audio because modern browsers require a user gesture before sound. On desktop, the mapped letter keys make short patterns faster, while clicking remains useful when you are learning the visual layout. Sustain can blend notes, so leave it off when you need to judge pitch boundaries clearly.
Browser sound can vary slightly with the device, speakers and audio processing. This tool is appropriate for pitch relationships and quick practice, not for tuning an instrument to laboratory precision. If no sound plays, check the device volume, silent mode, connected Bluetooth output and whether the tab has permission to produce audio.
Frequently asked questions about the online piano
Do I need an account or piano app?
No. The virtual piano runs in the browser and does not require registration. KulakApp is optional when you want a broader practice routine and progress features on your phone.
Can a beginner use this piano?
Yes. Keep the note labels visible, begin with adjacent white keys and use patterns of two or three notes. Increase the range only after you can describe what you hear.
Can this test perfect pitch?
No. Matching one generated note is a short listening exercise, not a diagnosis or proof of absolute pitch. Musical hearing includes several trainable skills, including comparison, memory, rhythm and reproduction.
Why are there fewer keys than on a real piano?
The compact range keeps touch targets usable on small screens and supports quick pitch checks. It is not intended to replace the range, dynamics, pedals or technique of a physical instrument.
Play a six-note phrase with your computer keyboard
Try this original practice phrase: C4–E4–G4–E4–D4–C4. It stays inside this piano’s range. Play one note per steady beat, with sustain off so you can hear where each note ends. On a phone, use the note labels; on a computer, the matching letters are shown below. The computer key A plays C4 here: keyboard shortcuts are controls, not musical note names.
| Step | Piano note | Computer key |
|---|---|---|
| 1 | C4 | A |
| 2 | E4 | D |
| 3 | G4 | G |
| 4 | E4 | D |
| 5 | D4 | S |
| 6 | C4 | A |
First follow the table. Then look away, sing or imagine the phrase and try it again. Its first three notes rise through a C major chord; the ending falls through E–D–C. If the fourth note is wrong, practise G–E on its own instead of repeating all six notes. This gives you a specific correction rather than a score to chase.
For a second version, change only E4 to D♯4, which is the same piano key as E♭4 in this equal-tempered tool. The computer sequence becomes A–E–G–E–S–A. Compare the two versions at the same speed: the third changes, while the first and highest pitches stay fixed. The piano chord guide explains that major–minor difference. If written symbols are the difficult part, try the treble-clef note-reading test before adding rhythm.
Hear a chord, then find its three keys
Open “Try a chord on this keyboard” beneath the piano controls. Choosing a name marks three keys but does not start sound. Press “Hear chord” for one short example. You can stop it immediately, choose a different chord or close the panel. The marked keys help you reproduce the example without having to hold three computer keys at once. They are a learning aid, not a score or a test of ability.
Start with C major. Its three pitches are C4, E4 and G4. Hear the whole chord, then play those keys separately from low to high. Now reverse the order. The order of your separate notes changes, but the collection of pitches remains the same. This is a useful first distinction between a chord, which names a harmonic collection, and a particular pattern used to play it.
Compare C major with C minor without changing everything
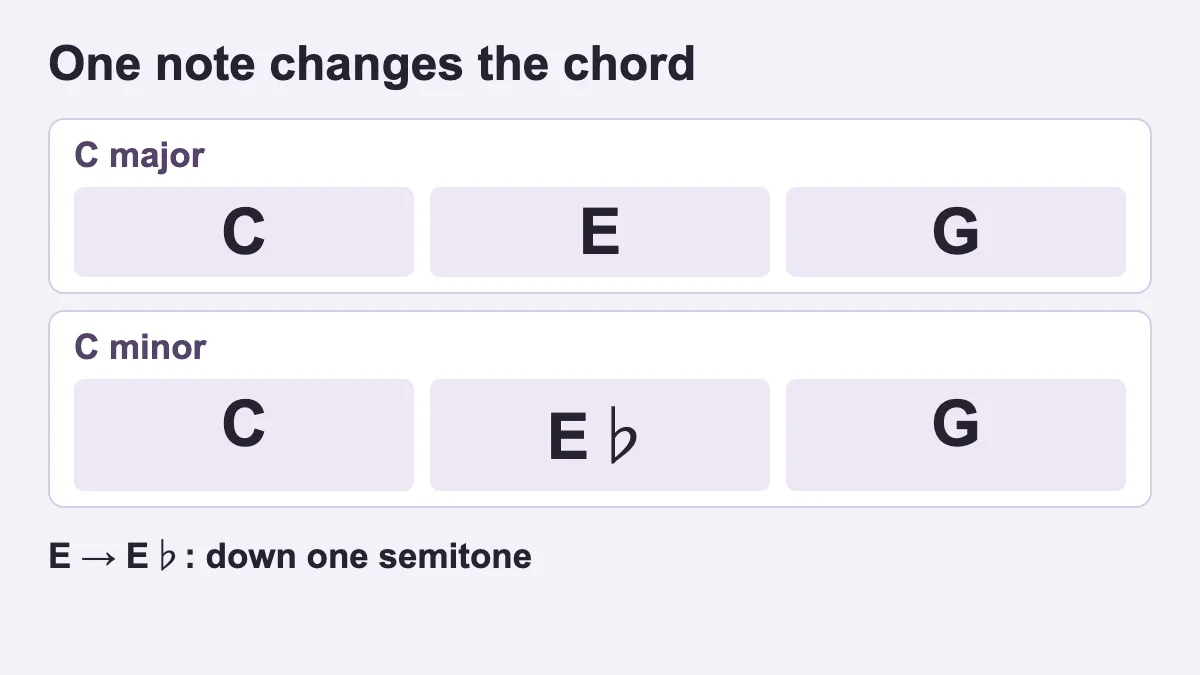
Select C minor next. C4 and G4 stay where they were; E4 moves down one semitone to E-flat4. This keyboard labels that black key D-sharp4. E-flat and D-sharp use the same key in this equal-tempered tool, although the names have different roles in musical spelling. C–E-flat–G is the spelling of the C minor triad. Keeping that distinction visible avoids teaching a convenient keyboard label as the only correct name.
Alternate the two examples slowly. Concentrate on the middle pitch, rather than trying to invent a rule about how a chord must make you feel. A chord's effect also depends on register, rhythm, surrounding harmony and the music being played. For this comparison, the reliable observation is concrete: the root and fifth stay fixed while the third moves. If the difference is unclear, compare just E4 and the D-sharp key before returning to the complete chords.
The piano chord guide explains the construction in more detail. Here, keep the task practical: locate, hear and reproduce one small shape. Ableton's explanations of major triads and minor triads provide another way to check the C examples. The examples on this page use KulakApp's own browser-generated sound, not recordings copied from those lessons.
The six chord examples and their exact notes
| Example | Keys, low to high | Listen for |
|---|---|---|
| C major | C4, E4, G4 | Reference major triad |
| C minor | C4, E♭4, G4 | Lowered third; E♭ uses D♯ here |
| F major | F4, A4, C5 | Same major structure, another root |
| G major | G4, B4, D5 | Another root-position major triad |
| A minor | C4, E4, A4 | C in the bass: first inversion |
| D minor | D4, F4, A4 | Root-position minor triad |
The A minor example needs special attention. This compact piano starts at C4, so A3 is outside its range. The example uses C4–E4–A4 instead: it still contains A, C and E, but C is the lowest note. That makes it first inversion, not a different chord. Do not conclude that the leftmost marked note is always the root. In the other five examples above, the root happens to be the lowest pitch.
Use one chord change as a listening experiment
Try C major followed by F major. In these particular voicings, the entire shape moves to a higher part of the keyboard. Listen once, then name the top note of each example: G4, then C5. Next compare C major with A minor. In the displayed A minor voicing, C4 and E4 remain while G4 moves to A4. That second comparison changes only one pitch, making it easier to hear exactly what moved.
Play C4 and E4 separately, then add G4. Pause. Return to C4 and E4, and finish on A4 instead. You are not trying to memorise a long chord progression. You are separating shared notes from changed notes. A useful answer sounds like “two pitches stayed, one went higher,” rather than “the second chord felt different.” Both observations can be genuine, but the first gives you something specific to verify on the keys.
Keep sustain off during this experiment. A lingering G can blur the switch to A and make you think the second example contains four notes. After the comparison is clear, turn sustain on briefly to hear why overlapping sounds change the result. Switch it off again before the next exercise. The short chord preview ends automatically regardless of the sustain setting; it is a bounded demonstration, not a pedal performance.
Build a small melody above a clear pulse
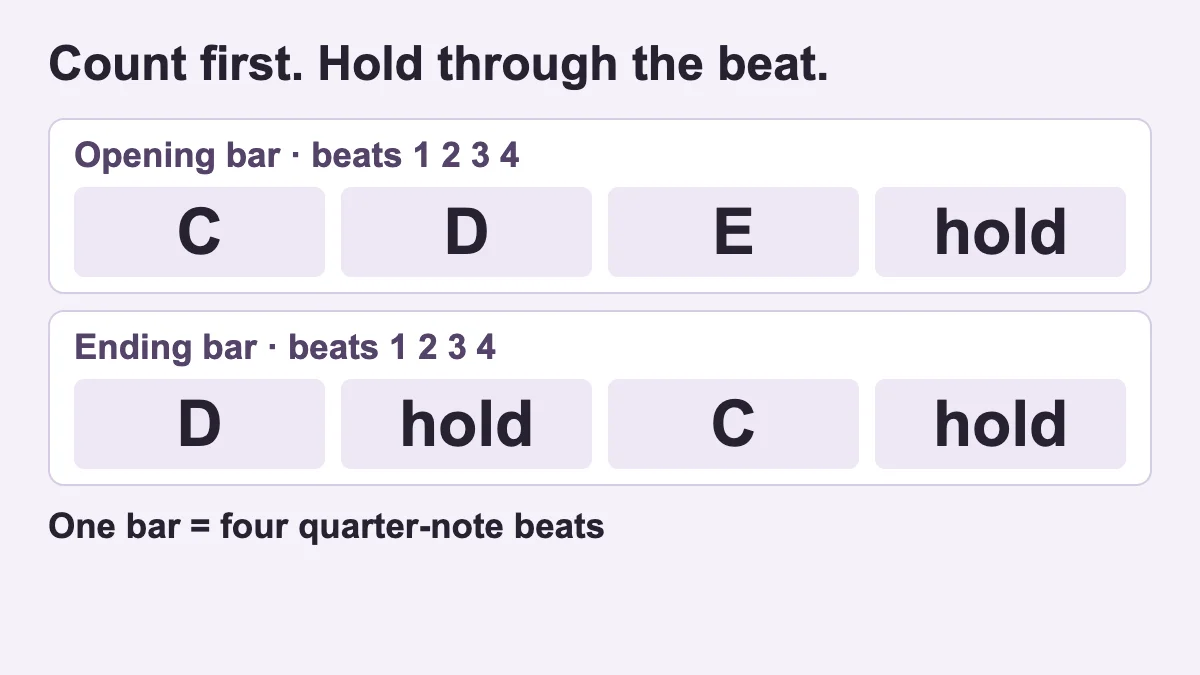
Use the notes C4, D4, E4 and G4 for an original four-bar exercise. Count four quarter-note beats in every bar. In bar one, play C4 on beat one, D4 on beat two and E4 on beat three; hold E through beat four. In bar two, play G4, E4, D4 and C4, one on each beat. In bar three, repeat the first bar. In bar four, play D4 for two beats and C4 for two beats. Stop there and listen to the ending.
At a quarter-note tempo of 60 BPM, each beat lasts one second, so the four bars occupy sixteen seconds. Establish the pace using the online metronome, then return to this keyboard. The metronome intentionally stops when its tab loses focus; these tools are not a synchronised multi-tab studio. For a short piano take, count aloud or keep the pulse internally. A physical metronome is another option if you need a continuous external reference.
When the notes are comfortable, change one thing only. Replace E4 with the E-flat key in bars one and three while leaving the timing unchanged. Compare the melodic effect with the C major/minor chord example. Then restore E4 and try a rhythm change instead: divide the first beat into two C4 notes of equal length. The total bar still needs four beats. These are different experiments—one changes pitch, the other changes the number and placement of attacks.
Make a short recording useful without treating it as a grade
The browser recorder stores note events for a brief take, not microphone audio. Use it to replay something you actually pressed. Before recording, decide what you want to check: the sequence, a held note, or the pause before the ending. Begin playing promptly after pressing Record, keep within the displayed recording limit, then stop and replay. A long wait at the beginning consumes part of the available take.
On your first replay, follow the note names. On your second, ignore the names and listen for one timing problem. For example, does the last C arrive early because you recognise the ending? Does the long E become two short E notes because you released and pressed again? These observations are more actionable than judging the whole performance as good or bad. The tool does not calculate your musical ability or award a recognised qualification.
The chord demonstration is separate from a recorded take. Starting it stops the recording or replay so that two exercises do not compete for the same keyboard. To practise a chord within your own take, press its individual keys yourself. The marked-note panel can guide your choice, but the preview button is not an automatic backing track that the recorder mixes into a performance.
Choose the next tool for the question you actually have
If locating a note is the problem, stay on the keyboard with labels visible. If reading the written symbol is the problem, use the note-reading test. If keeping the spaces between notes equal is difficult, work with the metronome before adding more pitches. If you want a reed-based sound and short melodic exercises, try the virtual melodica. Changing tools should make the question clearer, not simply add more controls.
For repeated listening practice, the ear-training test offers a short starting point, and KulakApp provides a route into regular app-based practice. A browser piano is especially useful for checking a musical idea immediately. It is not a substitute for physical piano technique, teacher feedback or the response of a weighted keyboard. Keep those boundaries in mind while enjoying the convenience of playing directly in your browser.
Virtual piano questions
Is the virtual piano free?
Yes. It works free in your browser without an account or download.
Does the virtual piano work on a phone?
Yes. Touch a key to start the browser audio engine.