Listen back without using a microphone
Choose “Record a take”, play a short pattern, then stop and replay it. The tool remembers pad names and timing for up to 20 seconds in this tab; it does not record your room or export an audio file. Compare the spaces between hits, not your speed. Clear the take when you finish. “Hear the six sounds” demonstrates the pads in order; the two beat buttons above it remain the tempo-controlled one-bar exercises.
Start with a beat you can count
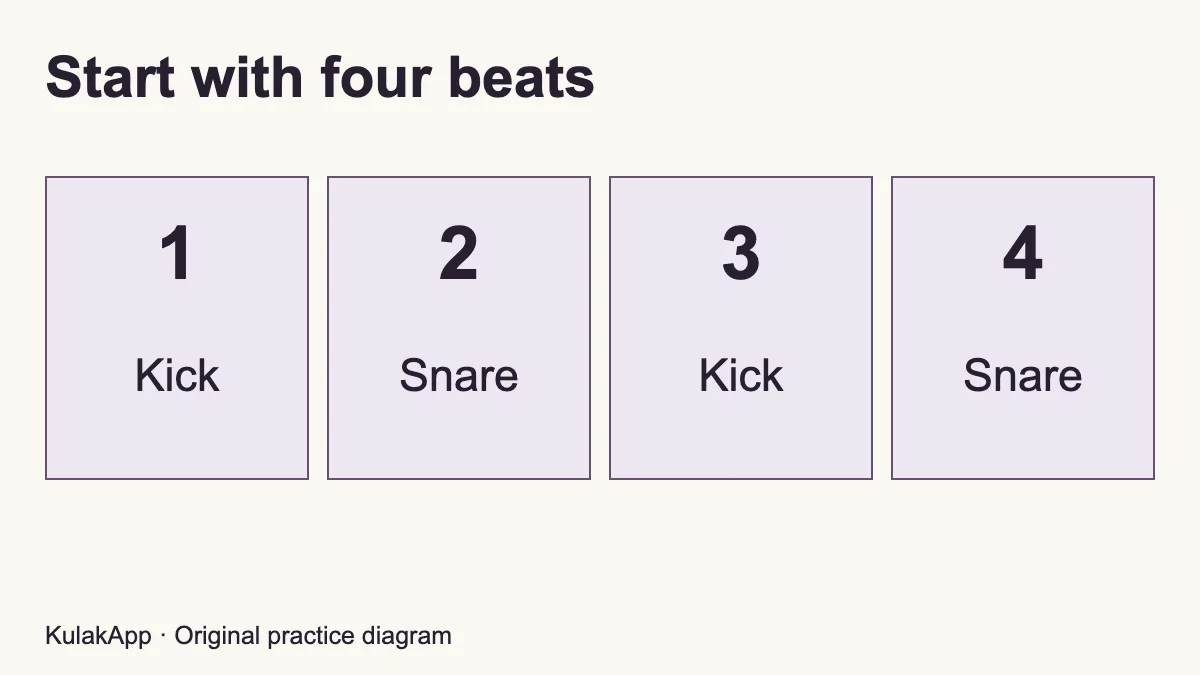
Before adding several sounds, tap four evenly spaced beats on a table and count “one, two, three, four.” Listen for the gap between taps. Does it get shorter as you approach four? Can you repeat the count without pausing longer before the next one? A steady pulse gives the different drum sounds somewhere to sit.
The first example puts the kick on beats one and three and the snare on beats two and four. Press “Listen to the first beat” and count along for one bar. After it ends, alternate the kick and snare pads in that order. You are not trying to reproduce a particular song. This is a small practice pattern for hearing where each sound belongs.
Meet the six percussion sounds
The pads play short recordings of acoustic percussion, rather than synthesized noise. They are drawn from separate VCSL instruments, not a single studio drum kit. The bass-drum recording serves the kick role. Dynamics, stick position and pedal technique on a real kit are more varied than these six fixed samples.
- Kick — A: a low, short sound that marks beats one and three in the example.
- Snare — S: a sharper drum sound that marks beats two and four.
- Hi-hat — D: a short, high sound used to make the spaces between beats audible.
- Tom — F: a rounded sound higher than the kick. Try it in place of another pad without changing your timing.
- Open hi-hat — G: a longer cymbal sound. A closed hi-hat hit cuts its tail.
- Crash — H: a sustained cymbal accent. Use it sparingly so the count remains clear.
Changing the instrument does not have to change the rhythm. Play kick, snare, kick, snare, then try tom, snare, tom, snare. Keep the gaps the same. That separation between sound choice and timing is useful when you move from copying a beat to understanding it.
Add eighth notes without speeding up
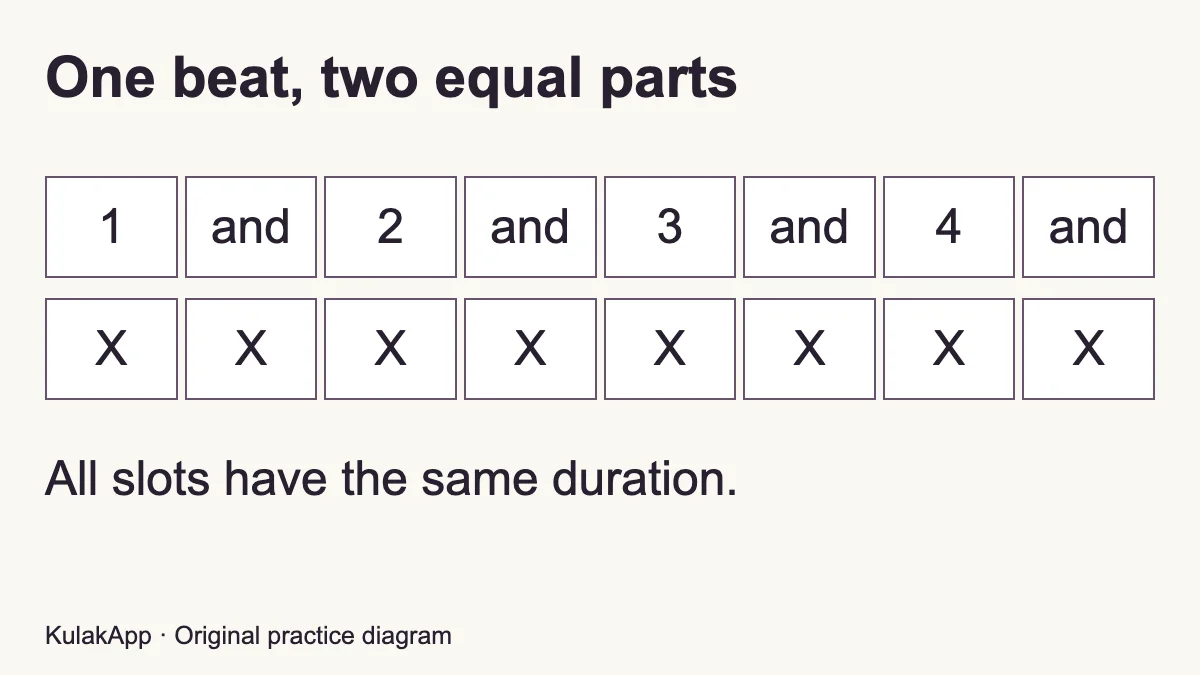
The second example keeps the same kick and snare positions and adds eight evenly spaced hi-hat sounds. Count “one and two and three and four and.” Each number is a beat; each “and” is halfway to the next beat. The hi-hat plays on both. The underlying tempo has not doubled, even though you hear more events.
Listen once for the hi-hat alone, then listen again for the kick and snare. Notice that some sounds happen together. If playing two pads at once is awkward, practise each part separately. Computer keyboards differ in how many simultaneous keys they detect, so a missing key press is not automatically a timing mistake.
Choose a useful tempo
BPM means beats per minute. At 60 BPM, the main beats in these examples are one second apart. A lower number gives you more time between beats; a higher number makes those gaps shorter. Start where you can count without rushing and adjust from there. There is no single practice tempo that suits everyone.
The tempo setting applies the next time you start an example. Each example plays for one bar, then stops so you can answer it on the pads. It does not run an endless background loop. For longer practice with a steady pulse, use the online metronome.
A short practice routine
- Spend a minute identifying each sound. Look away from the labels and listen for differences in pitch and texture.
- Alternate kick and snare for four beats. Pause, count again, and repeat without increasing the speed.
- Listen to the second example and follow only the hi-hat. Say every number and every “and” evenly.
- Replace the kick with the tom. Keep the timing while the sound changes.
- Finish with the part that was least clear. Compare two adjacent beats instead of repeatedly restarting a whole pattern you do not yet understand.
Using virtual drums on a phone
Audio starts only after an interaction. If the pads are silent, check the media volume, silent-mode behaviour and the selected audio output. A connected headset may be receiving the sound instead of the phone speaker. Keep the level comfortable; turning everything up is not the first troubleshooting step.
Bluetooth audio can add delay between a tap and its sound. Comparing it with the device speaker or wired headphones can help you identify that delay. Browser performance and other open applications may also affect the response. This simple tool is not a calibrated timing assessment, so it does not give a score for how precisely you tap.
Press Stop to end the current example and any remaining sounds. Playback also stops when the tab is hidden or the window loses focus. When you return, start a new example yourself. The tool does not request microphone access or save your playing as an audio recording.
What this tool can and cannot replace
An online drum kit is a convenient way to explore rhythm and contrasting sounds. It cannot teach the physical details of drumming: grip, stick rebound, foot coordination, posture and touch all require different practice. Playing a pattern on a screen does not demonstrate mastery of those skills.
For listening rather than finger coordination, continue with rhythm ear training. If writing down the counts helps, try the printable rhythm worksheets. The virtual piano offers a separate way to explore pitch. Keep the web exercises short, identify what you want to improve, and use that observation to choose your next practice session.
Continue practising away from the screen
If you do not have access to a kit, the guide to practising drums without a drum set separates counting, alternating hands and a simple foot pulse. It also explains which physical skills still require a suitable pad or real instrument.
Build a pattern from the sounds
Compare kick, snare and hi-hat positions in the beginner drum beat examples. To understand why more hits do not necessarily change the tempo, explore quarter, eighth and sixteenth note values.
Hear how the beat is grouped
Compare 3/4 and 6/8 time to hear why six equal eighth notes can form three pairs or two groups of three. The guide separates grouping from tempo and includes original counting exercises.
Set up the browser before judging your playing
Start with one pad and a low volume setting. Press and release it several times, leaving a clear gap between attempts. Check that the sound comes from the output you intended. If you are using headphones, confirm that the browser is not sending audio to a different device. Only raise the volume once you know where the sound is going.
Keep the drum controls visible while practising. On a small screen, bring the pads into view before starting an example rather than scrolling midway through it. On a computer, click outside any text or number field before using the letter shortcuts. A shortcut should not be mistaken for text entry while you are changing a setting.
Use short presses to understand the response. Holding a key is not a substitute for deliberately repeating a rhythm, and this tool does not turn key pressure into the touch of a real drumstick. Judge the order and spacing of your actions, not how hard you press the glass or keyboard.
Listen, pause, answer: a useful way to use one-bar examples
The example buttons provide a brief reference rather than a backing track that continues indefinitely. Listen to the complete bar once without playing. Count its four beats and notice where the last sound belongs. When the example finishes, take a fresh count-in and answer with the same sound order on the pads.
Next compare only the first two beats. Identify the low sound on one and the sharper sound on two. If their order is unclear, repeat that pair before adding the rest of the bar. This is more informative than repeatedly starting a full pattern and guessing where you lost it.
When you are comfortable with the order, focus on the return from four to the next one. Many first attempts keep the middle of the bar reasonably even but insert a long pause at the boundary. Speak the count continuously for two bars while playing just the first. Continue counting through the second bar without playing, then start again at a clear one.
Separate what you hear from what your fingers can do
You might recognise the kick and snare pattern accurately but find simultaneous screen taps awkward. That does not prove that you failed to hear the rhythm. Conversely, memorising a keyboard sequence does not prove that you can recognise the pattern without looking. These are related but distinct tasks.
Try a listening pass with your hands still, followed by a playing pass while you can see the labels. After that, name the sound that should occur on each numbered beat. This separates sound recognition, pattern memory and control of the interface. Choose the task you want to practise instead of combining all three immediately.
For a physical coordination session away from the screen, follow the linked equipment-free practice guide. The browser is useful for hearing contrasting layers, but it does not measure stick rebound, pedal movement or acoustic drum dynamics. A missing simultaneous keyboard event may also reflect the keyboard’s hardware rather than a musical error.
Keep a tiny practice log instead of inventing a score
This virtual drum tool deliberately does not award an accuracy percentage. It has no calibrated reference for the complete delay from your finger to the sound reaching your ears. You can still make useful observations. Record which example you used, the selected tempo and one concrete issue you noticed.
| What to note | Example entry |
|---|---|
| Reference | First beat, then the hi-hat example |
| Setting | 60 BPM; device speaker |
| Observation | The gap before the next one became longer |
| Next task | Count two bars without pausing at the boundary |
The sample entry is an illustration, not a stored user result. The tool does not create this log automatically. Keep personal notes wherever you normally record your practice. One precise observation is enough; you do not need to assign yourself a grade after every short attempt.
When the sound is late, missing or interrupted
If every sound arrives late but the order is consistent, compare the current audio output with the built-in speaker or a wired connection where available. Bluetooth buffering can change the feel of direct tapping. Reducing the written tempo will not remove an output delay, though slower practice may make separate events easier to follow.
If one key fails while others work, test its corresponding on-screen pad. Then try the key by itself rather than as part of a combination. This helps distinguish a shortcut or keyboard limitation from a sound problem. Check whether a number input still has focus before assuming that the pad is broken.
If the example stops after switching apps or tabs, return to the page and start it again deliberately. Stopping playback when the page loses focus prevents an exercise from continuing unexpectedly in the background. Do not repeatedly press the example button to compensate for an interruption; begin with one clean reference.
Choose the next exercise from the difficulty you noticed
If the main issue is recognising the sound order, keep using the first one-bar reference. If the eighth-note spaces are unclear, read the linked note-value guide and count the hi-hat separately. If you can hear the parts but cannot combine them on screen, simplify to one part instead of adding more sounds.
If your question is how to construct a different groove, use the beginner drum beat guide rather than expecting the two reference buttons to provide a complete pattern library. For grouping in three or compound two, use the linked 3/4 and 6/8 comparison. The examples built into this tool remain four-beat examples; changing the tempo does not change their meter.
Finish with a clear next action: repeat one bar, read one explanation or continue an ear-training exercise in KulakApp. A short web session is most useful when it helps you identify what to practise next, not when it keeps you pressing buttons without listening to the result.
Build your own one-bar drum pattern
The short beat builder offers a different way to use these sounds. Instead of tapping every hit in real time, you place hits into sixteen equal positions and listen to the result. This lets you hear how a pattern changes when one event moves. It is a small practice sequencer, not a full music-production workstation: there is one bar, four editable sound parts and no audio export.
Open the builder and choose Kick, Snare, Hi-hat or Tom. The sixteen buttons show the selected sound’s part only; the other three parts remain in memory and play alongside it. A selected step has a check mark as well as a different colour. Click or tap the step again to remove that hit. Keyboard users can reach each button with Tab and activate it with Enter or Space.
On a narrow phone screen, the steps wrap into four rows of four. Read across each row before moving down. Each row is one beat, divided into “number, e, and, a.” On a wider screen, two beats may fit across one row. The written labels keep their musical meaning regardless of the visual layout. Step five is beat two; it does not become a different beat when your phone rotates.
| Beat | Step numbers | Say |
|---|---|---|
| 1 | 1, 2, 3, 4 | 1 e & a |
| 2 | 5, 6, 7, 8 | 2 e & a |
| 3 | 9, 10, 11, 12 | 3 e & a |
| 4 | 13, 14, 15, 16 | 4 e & a |
Here the tempo number describes quarter-note beats in 4/4. Each step lasts a quarter of one beat, so at 60 BPM adjacent steps are a quarter of a second apart. Turning on more steps adds more attacks without changing that underlying beat. The builder deliberately stays with equal sixteenth-note divisions; it does not provide swing, triplets or a different time signature.
Hear the three starting patterns
Steady beat places kick on beats one and three, snare on two and four, and closed hi-hat on every number and “and.” Select each sound in turn and find those positions. Notice that the kick and hi-hat can share a step. The builder plays those sounds together; you do not need to coordinate two fingers to hear that combination.
Extra kick keeps the other parts and adds a kick on the “and” of beat two. Listen to the space between that additional kick and the next kick on beat three. Do not assume that adding a hit makes a pattern more musical or more advanced. The point is to hear the effect of one intentional change while the rest remains familiar.
Tom ending uses the last part of the bar for two tom hits. The final hi-hat positions are removed so you can hear that ending clearly. Count right through the last tom into the next bar’s first kick. This is an original practice pattern, not a transcription of a named drummer or recording. You can use it to explore the boundary between a repeated groove and a short ending.
Change one thing before changing everything
Load Steady beat, select Kick and remove the hit on beat three. Play the pattern and listen for the empty space. Then restore that hit and remove the kick on beat one instead. Both versions contain fewer kick attacks, but their relationship to the bar is different. Make the comparison at the same tempo, with the snare and hi-hat unchanged.
Editing a step stops playback. Press Play again to hear the updated version from its first step. This makes the comparison easier to follow and avoids a half-edited pattern changing underneath your count. Selecting another sound to inspect its steps does not alter the rhythm. The hit totals below the grid help you check whether you accidentally changed a second part.
Each Play action repeats the one-bar pattern eight times and then stops. You can stop sooner, close the builder or press Escape. Switching away from the page also stops it. At 80 BPM, eight four-beat bars take about twenty-four seconds. Use that brief repetition to listen to one feature, then pause and decide whether another attempt would answer a new question.
Tapping a beat and programming a beat are different skills
The six-pad drum kit asks you to choose when each sound starts. The beat builder asks you to choose a position on a fixed grid. A neatly programmed pattern is not evidence that your hands could perform it at that tempo. Equally, awkward screen tapping does not mean you failed to understand the pattern. Use the builder to inspect musical placement and the pads to try a short real-time response.
The pad recorder and the beat builder are separate. “Record a take” remembers your pad actions for a short replay; it does not capture the builder’s scheduled pattern or record an audio file. Starting a pad, a pad example or a take stops the builder so the two activities do not create an unexpected backing track. Start with one mode, listen to its result, and switch deliberately.
The builder includes kick, snare, closed hi-hat and tom. Open hi-hat and crash remain available on the six-pad kit above, but they are not editable builder tracks. There is no microphone permission, sample upload, account or automatic saving. Reloading the page clears the edited pattern. If you want to remember it, write down its active step numbers before leaving; do not rely on it being restored on your next visit.
For a deeper look at how different grooves are assembled, continue with the beginner drum beat examples. For alternating sticking patterns on a physical practice surface, use the introduction to drum rudiments. Those lessons have different aims: a grid of sound events cannot demonstrate stick rebound or teach the feel of a double stroke.
Turn one drum pattern into a listening exercise
Choose a pattern, listen once, then stop it before looking closely at the grid. Try naming where the snare occurred. Was it on the numbered beats two and four, or did you hear it between numbers? Reopen the snare part and compare your answer with its selected steps. This is a self-check you perform, not a hidden score generated by the site.
Next describe the kick part without copying the visual positions. If you need a second listen, take it. Once the sound order is clear, tap the kick and snare part on the pads at a comfortable pace. Leave out the hi-hat initially if it divides your attention. Add it only when combining the parts helps rather than obscures what you are trying to hear.
When you want a melody instead of percussion, try the virtual melodica. It lets you explore pitch order while this drum tool emphasizes attack timing and contrasting sounds. Both can support a short musical experiment, but neither is a diagnosis of talent. For varied rhythm and pitch listening tasks beyond this one-bar editor, use the KulakApp store links on the page.
Beat builder questions
Why does the pattern stop when I change the tempo?
The new tempo is applied when you press Play again. Restarting from step one gives the revised rhythm a clear beginning. The builder does not gradually accelerate an existing loop, and changing its tempo does not change the separate one-bar example controls above it. Check the label “Builder tempo” when deciding which setting you want to adjust.
Can I make a pattern with silence?
Yes. An unselected step contains no new hit for that sound. It is still a position in time, so do not skip it when counting. If you clear all four parts, Play asks you to add a hit rather than running an inaudible loop. A sample may continue ringing after its start; an empty step does not necessarily cut off the tail of an earlier sound.
Will selecting a different sound erase my beat?
No. The sound buttons choose which part you are editing. To replace all four parts, select one of the named starting patterns. Clear pattern removes every selected hit. These actions affect only the short builder pattern in this page, not files on your device or anything inside the KulakApp mobile application.