Beginner drum beats: count, build and change a groove
A useful first drum beat places the kick on beats one and three, the snare on two and four, and a steady hi-hat above them. Learn those parts separately, then combine them without changing the count. The examples below show how adding, moving or leaving out one hit changes the pattern while the bar stays the same length.
Listen to a one-bar drum beat
Start with kick on beats 1 and 3 and snare on 2 and 4. The second example adds steady eighth-note hi-hats. The last adds a single tom on “4 and”; it is a small variation, not a faster tempo. Each example stops after one bar so you can answer it yourself.
Choose an example. Start at a low volume.
| Count | 1 | and | 2 | and | 3 | and | 4 | and |
|---|---|---|---|---|---|---|---|---|
| Kick | × | — | — | — | × | — | — | — |
| Snare | — | — | × | — | — | — | × | — |
| Hi-hat | × | × | × | × | × | × | × | × |
Follow the numbers before following every hi-hat hit. At 60 BPM, each number arrives one second after the previous one; each “and” is halfway between. If that feels crowded, return to kick and snare. The diagram describes the second example; only the third adds the tom.
Try your answer on the virtual drums, or keep a steady pulse with the online metronome. Sounds use adapted VCSL acoustic percussion samples (CC0). No microphone or automatic timing score is involved.
You can explore the sounds with the virtual drum kit before trying them on an instrument. A screen helps you hear placement; it does not reproduce stick rebound, pedal technique or the physical balance of a kit. These original short patterns are not song transcriptions, and no particular tempo is required to begin.
Read time across the page, not down the instrument list
Each grid describes one bar of 4/4 using eight evenly spaced positions: “1 and 2 and 3 and 4 and.” The numbers are the four quarter-note beats in these examples. The “ands” divide each beat in half. An X means a new hit at that position; a dash means no new hit from that instrument. Read vertically to find sounds that happen together.
The three rows are hi-hat, snare and kick. A mark in all three rows of one column means three simultaneous attacks, not three successive beats. Conversely, an empty position still takes time. Do not skip its space when counting. This is a teaching grid rather than a universal drum-notation system; conventional staff notation uses its own noteheads and placement.
| Row | Sound or role | First thing to listen for |
|---|---|---|
| Hi-hat | Short cymbal sound | Even spacing above the other parts |
| Snare | Contrasting drum attack | Placement on beats two and four |
| Kick | Low bass-drum sound | Where the pattern begins and where it changes |
In much backbeat-based music, the snare on two and four provides a familiar reference. That is the starting arrangement here, not a law for every style. Learning one clear arrangement makes later changes easier to identify. It should not become a reason to call every different rhythm incorrect.
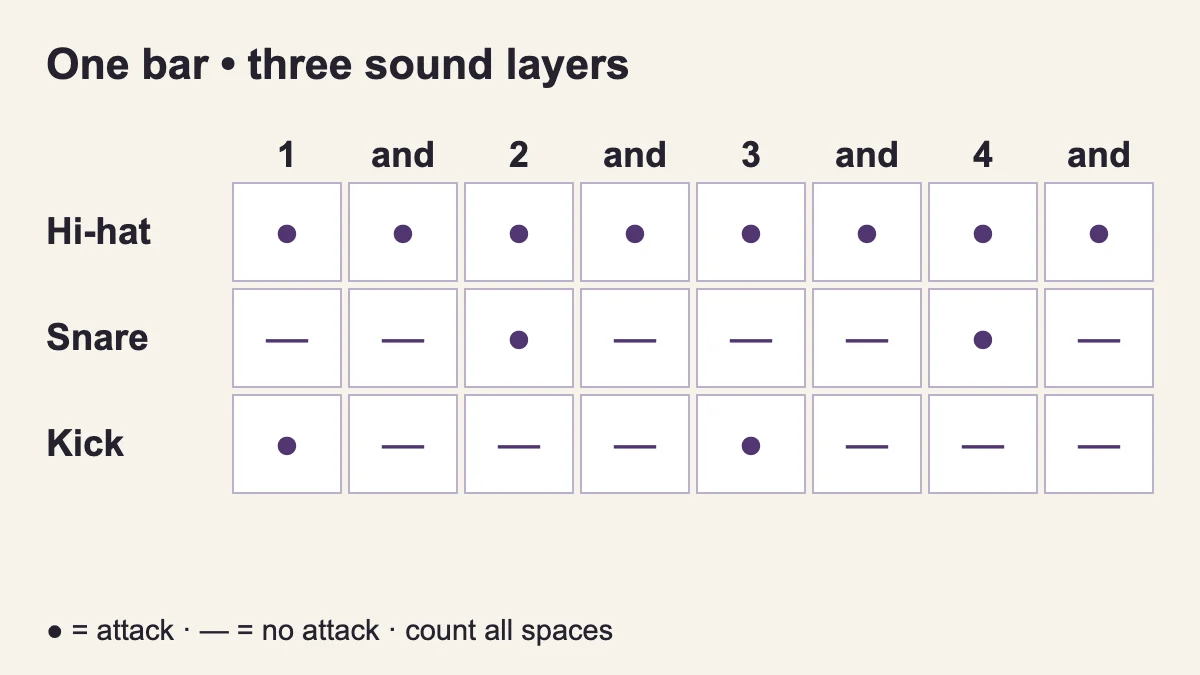
Build the layers before playing the complete pattern
Start by counting four beats without playing. Add a hi-hat sound on each number. Next, listen to the kick and snare alternation alone: kick, snare, kick, snare. Once you can follow both ideas, place the hi-hat and the relevant drum together on each number. There should not be a tiny extra count between simultaneous sounds.
If coordinating those sounds is difficult, inspect only beats one and two. Find the kick-plus-hi-hat event, then the snare-plus-hi-hat event. Say the count while alternating them. Add beats three and four when that relationship is clear. You are assembling a pattern, not trying to pass an all-or-nothing coordination test.
For a physical kit, the movement used to produce each sound also needs attention. A finger pressing a kick shortcut on a computer is not the same as using a bass-drum pedal. Keep the listening exercise and the physical technique task distinct. If you do not have a set, the equipment-free drum practice guide offers counting and movement preparation.
Five beginner patterns, with one clear task each
Use the same comfortable pulse throughout the first comparison. Pattern A is deliberately sparse. Pattern B adds subdivisions. Patterns C and D change the kick in different ways. Pattern E creates space by removing selected hi-hat hits. The names simply identify our exercises; they are not claims of inventing a musical genre.
| Sound | 1 | and | 2 | and | 3 | and | 4 | and |
|---|---|---|---|---|---|---|---|---|
| Hi-hat | X | — | X | — | X | — | X | — |
| Snare | — | — | X | — | — | — | X | — |
| Kick | X | — | — | — | X | — | — | — |
| Sound | 1 | and | 2 | and | 3 | and | 4 | and |
|---|---|---|---|---|---|---|---|---|
| Hi-hat | X | X | X | X | X | X | X | X |
| Snare | — | — | X | — | — | — | X | — |
| Kick | X | — | — | — | X | — | — | — |
| Sound | 1 | and | 2 | and | 3 | and | 4 | and |
|---|---|---|---|---|---|---|---|---|
| Hi-hat | X | X | X | X | X | X | X | X |
| Snare | — | — | X | — | — | — | X | — |
| Kick | X | — | — | X | X | — | — | — |
| Sound | 1 | and | 2 | and | 3 | and | 4 | and |
|---|---|---|---|---|---|---|---|---|
| Hi-hat | X | X | X | X | X | X | X | X |
| Snare | — | — | X | — | — | — | X | — |
| Kick | X | — | — | — | — | X | — | — |
| Sound | 1 | and | 2 | and | 3 | and | 4 | and |
|---|---|---|---|---|---|---|---|---|
| Hi-hat | X | X | X | — | X | X | X | — |
| Snare | — | — | X | — | — | — | X | — |
| Kick | X | — | — | — | X | — | — | — |
Pattern A: four clear landmarks
The hi-hat plays on 1, 2, 3 and 4. The kick plays on 1 and 3, while the snare plays on 2 and 4. Count the empty “and” positions even though none of the three parts starts a new sound there. This leaves room to notice whether the four numbered events are actually evenly spaced.
There are four hi-hat hits, two snare hits and two kick hits: eight individual attacks distributed across four sounding positions. That distinction matters. Counting instruments struck is not the same as counting beats. Try naming the combination at each number before moving your hands.
Pattern B: add the spaces between the numbers
Keep the kick and snare exactly where they were. Now let the hi-hat play on every number and every “and,” producing eight hi-hat hits in the same bar. The beat has not become faster just because the cymbal part has become busier. The next “one” should still arrive at the same point.
Alternate one bar of A with one bar of B while counting continuously. If B rushes, play its hi-hat row alone over a steady reference, then rebuild the other parts. If A feels strangely empty afterwards, keep counting its silent subdivisions rather than adding accidental extra notes.
Pattern C: add a kick just before beat three
Begin with B and add one kick on the “and” after beat two. Its kick row is now 1, 2-and and 3. Keep the kick on three: this is an addition, not a replacement. The new event falls halfway between the snare on two and the kick on three.
Practise the segment “two and three” first. Hear snare, kick, kick, while the hi-hat marks all three positions. Avoid squeezing the last two kicks together. When the spacing is clear, connect the segment back to the full bar. You do not need to increase the tempo to hear what changed.
Pattern D: move the second kick after beat three
Return to B, remove the kick on three, and put it on three-and instead. The kick row contains two hits again: 1 and 3-and. The hi-hat still marks beat three, so that beat has not disappeared. You are changing one instrument’s entry within the established pulse.
Compare C and D slowly. C has three kick attacks, including the numbered beat three. D has two kick attacks and leaves that numbered position to the hi-hat. If both patterns sound identical, check whether you accidentally retained or removed a kick. A specific comparison is more useful than calling both examples simply “offbeat.”
Pattern E: let selected hi-hat positions stay empty
Keep the kick on one and three and the snare on two and four. Play the hi-hat on 1, 1-and, 2, 3, 3-and and 4. There is no new hi-hat hit on 2-and or 4-and. Those two spaces create a different texture without changing the length of the bar.
Count all eight positions aloud while playing only the marked ones. If you shorten the gaps, the next bar will begin too early. You can first replace the missing hi-hat hits with silent hand motions, then remove those motions while keeping the internal count. Do not add a crash merely to fill the silence.
A short fill is useful only if you return on time
A fill temporarily changes the repeating accompaniment. For a first exercise, use Pattern A through beat three, then play two snare attacks on “four and.” Omit the hi-hat on those two positions for this version. Return to the original kick-plus-hi-hat on the following one.
The complete transition bar therefore has hi-hat hits on 1, 2 and 3; kick hits on 1 and 3; and snare hits on 2, 4 and 4-and. It still spans four beats. The fill does not add a fifth beat, and the second snare attack should not delay the next bar.
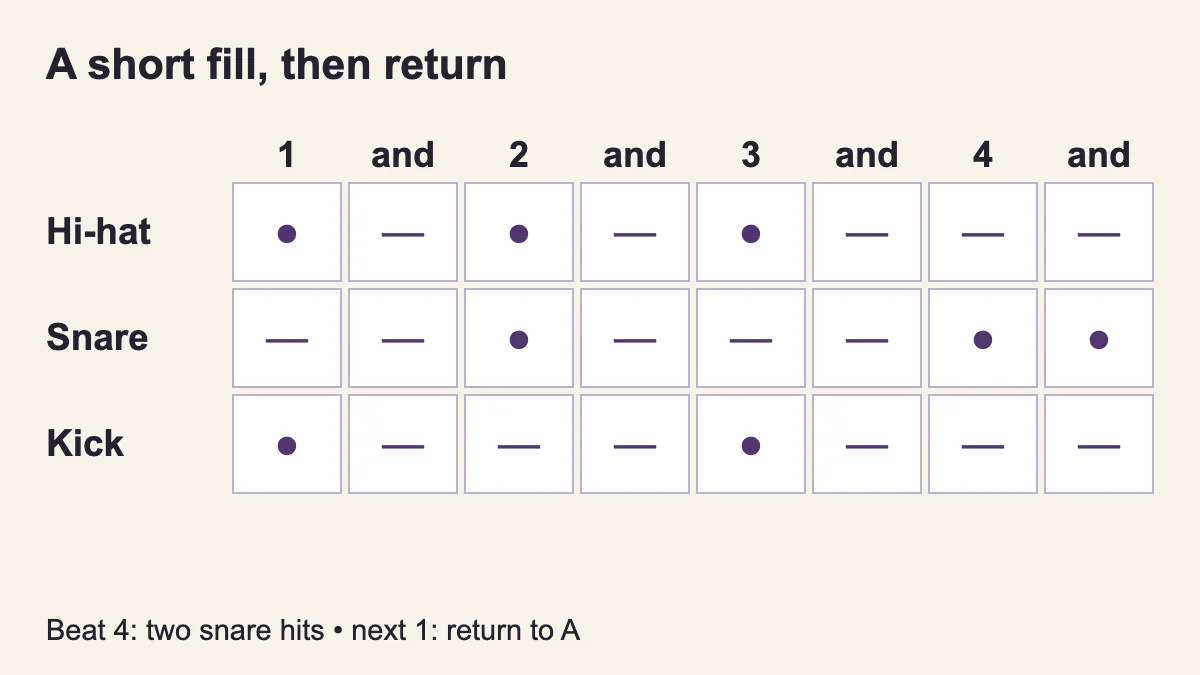
Practise a two-bar loop: one unchanged bar of A, followed by the transition bar, then restart. Count past the fill into the next one instead of treating the last snare as the finish line. The point is the connection. A very simple fill with a clear return is a better exercise for this task than a long string of hurried hits.
Choose a tempo that reveals the detail
Open the online metronome and let one click represent each numbered quarter-note beat. Begin at a speed where you can say the complete count comfortably. A displayed BPM number is only useful when you know which musical unit the click represents.
Work on one bar for several repetitions, then stop and describe what happened. Did a simultaneous pair separate? Did the added kick make the following beat early? Did the empty hi-hat position disappear from your count? Choose one observation and make the next attempt about that detail.
Increase difficulty by changing just one thing: another pattern, a longer connection or a slightly different tempo. Faster is not automatically better. The ability to repeat the same spacing and deliberately switch between two versions is also progress. There is no universal repetition count that proves you have mastered a beat.
Distinguish a timing issue from a sound-balance issue
You may play the intended positions but struggle to hear the kick underneath a loud cymbal part. That is different from putting the kick on the wrong subdivision. When possible, listen to the rows separately, then combine them. On a physical kit, work on sound balance with suitable instruction rather than solving every uncertainty by hitting harder.
A browser instrument introduces another possible issue: sound delay. If the response feels noticeably late, compare isolated taps and check the audio connection before judging your rhythmic ability. The virtual kit is not a calibrated timing assessment. Wireless audio or device processing can complicate what you hear.
Likewise, the synthetic hi-hat or kick on a web page is not a promise of a specific acoustic instrument’s tone. The sound labels identify their musical roles. Use the tool for a short placement comparison; practise real stick and pedal technique on appropriate equipment.
Write a practice note that tells you what to do next
Instead of recording only minutes played, write the pattern letter, your count and one observation. For example: “C, one click per number: the kick on two-and is clear alone, but beat three arrives early when the hi-hat is added.” That sentence suggests the next task without relying on a vague good/bad score.
If reading the columns is the difficult part, use the rhythm worksheets to mark sounding positions before playing. If the length of a subdivision is unclear, review quarter, eighth and sixteenth note values. If you hear the pattern but cannot reproduce it, separate memory from movement by speaking it first.
Check the pattern before checking your speed
Question 1: Which pattern has a kick on the “and” after beat two? The answer is C. Its extra kick is between the snare on two and the kick on three. Pattern D changes the second kick to three-and instead.
Question 2: How many hi-hat hits are in E? There are six. Two positions, two-and and four-and, contain no hi-hat attack. They still occupy their normal time, so the bar remains four beats long.
Question 3: Does the two-note snare fill add time to the bar? No. It occupies the existing fourth beat as two equal eighth-note positions. The original pattern returns on the following one.
Common questions
Is this the same as learning a whole song?
No. A song may change patterns, dynamics, tempo feel or section length. These short examples isolate relationships that you can later recognise within music. They are not transcriptions of named recordings.
Must my right hand always play the hi-hat?
No single hand assignment fits every setup or player. The grids describe sound placement, not a compulsory physical layout. On a real kit, choose a suitable setup and get help with technique where needed.
Why does a simpler beat sometimes feel harder?
Removing notes can make uneven spacing easier to notice. Keep the underlying subdivision clear instead of using extra hits to cover uncertainty. Silence is part of the pattern, not a break in the clock.
Sources and original exercise notes
Basic kit roles were checked with Drumeo’s drum introduction. Rhythmic subdivision terminology follows the distinction explained in Open Music Theory’s rhythmic values reference. The five comparison grids, transition example and checking questions were prepared for KulakApp; no third-party music, illustration or recording is reproduced.