Major scales: build the notes, check the pattern and practise with a purpose
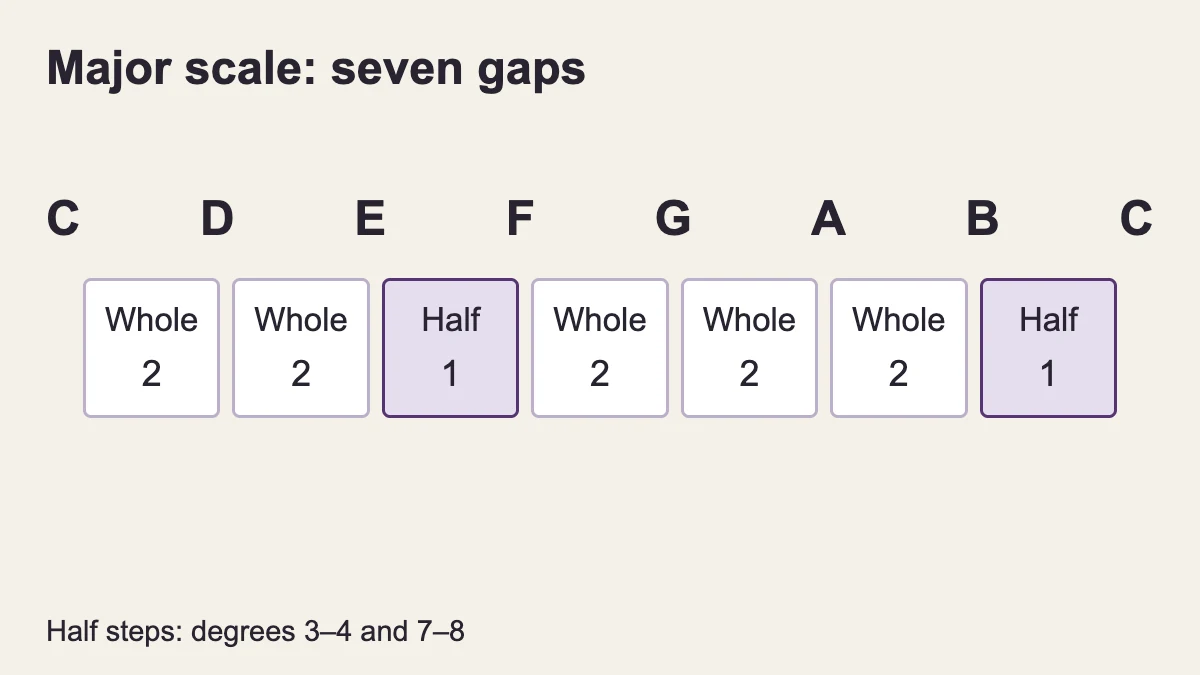
A major scale follows the ascending step pattern whole, whole, half, whole, whole, whole, half. Choose a starting note, keep the letter names in order and adjust sharps or flats to preserve that pattern. C major uses only white piano keys; other major scales keep the same distances but begin elsewhere. The method works because of the intervals, not because of a particular keyboard shape.
This guide shows how to build and check major scales, read a reference chart and turn a note list into useful listening practice. Use the virtual piano to locate notes, or a physical keyboard to work on movement. You do not need to play all the scales quickly to understand how they are constructed.
What whole steps and half steps mean on a keyboard
A half step, also called a semitone, goes from one piano key to its immediate neighbour. Both black and white keys count. E to F and B to C are half steps even though both notes use white keys. C to D is a whole step because C-sharp lies between them. A whole step contains two half steps.
When counting, start at zero on the first note. From C, one movement reaches C-sharp and a second reaches D. Counting C itself as the first movement produces a different answer. If the idea feels confusing, point at the starting key without sounding it, then count each actual change of key.
Upward on the piano means moving toward higher pitches, normally to the right. This guide first constructs scales upward. When you later descend through the same major scale, the notes remain the same but the order of the step sizes reverses. Do not apply the ascending formula unchanged from the top and expect the same note collection.
Remember where the two half steps belong
Write eight positions: the seven different note names and the starting name repeated at the octave. There are seven gaps between them. In a major scale, the small gaps occur between positions three and four, and between seven and eight. The other gaps are whole steps. This gives you a second way to check the formula.
For C major, the notes are C–D–E–F–G–A–B–C. E to F supplies the first half step, and B to C supplies the second. The remaining neighbouring notes in that list are a whole step apart. The white-key layout happens to match the pattern when C is the starting point.
Use each letter once before repeating the starting note
A conventionally written major scale uses the seven letter names in sequence. If you start on D, write D, E, F, G, A, B and C before deciding which notes need accidentals. Repeat D at the top. This framework prevents you from naming two different degrees with the same letter and skipping another letter entirely.
The piano alone cannot tell you which spelling best explains a scale. F-sharp and G-flat share a key on an equal-tempered keyboard, but they are not interchangeable in every written context. In G major, the seventh degree is F-sharp. Writing G-flat there would give you two versions of G and no F.
Use two checks together: correct key distances and correct letter sequence. One catches sound errors; the other catches spelling errors. A scale can sound right on the piano while being written misleadingly. Conversely, using all seven letters does not guarantee that your sharps and flats produce the major pattern.
Build G major without memorising a diagram
Begin with G–A–B–C–D–E–F–G. G to A and A to B are whole steps; B to C is a half step. C to D and D to E are whole steps. So far the list matches the formula. The next gap, E to F, is too small: you need a whole step in the sixth gap.
Raise F to F-sharp. E to F-sharp is now a whole step, and F-sharp to the upper G is a half step. One change fixes both remaining gaps. Your finished scale is G–A–B–C–D–E–F-sharp–G. Play the last three notes separately to hear where the adjustment belongs.
Now explain the answer without looking at the list. “G major has F-sharp” is useful, but “F-sharp makes the sixth gap whole and the final gap half” shows why it is necessary. That explanation transfers to a starting note you have not memorised yet.
Build F major and understand why B-flat is needed
Write F–G–A–B–C–D–E–F. The first two gaps are whole steps. The third gap, A to B, is also whole, but the major formula needs a half step there. Lower B to B-flat. A to B-flat becomes half, while B-flat to C becomes whole.
The remaining gaps C to D, D to E and E to F already fit. F major is therefore F–G–A–B-flat–C–D–E–F. Notice that the adjustment was not made because black keys are inherently major or minor. It was made to preserve a particular sequence of distances.
Writing A-sharp instead of B-flat would reach the same piano key but obscure the scale’s letter sequence. F major needs a kind of B in its fourth position. This is a good early example of why naming the key and spelling the degree are related but different tasks.
D major and B-flat major: try two alterations
For D major, begin D–E–F–G–A–B–C–D. E to F must become a whole step, so raise F to F-sharp. That also makes F-sharp to G the required half step. At the top, B to C needs to become whole, so raise C to C-sharp. C-sharp to D then supplies the final half step.
The result is D–E–F-sharp–G–A–B–C-sharp–D. Compare it with G major. Both contain F-sharp, but D major also contains C-sharp. Rather than simply counting how many black keys appear, identify the scale degrees that use them: three and seven in this D major example.
For B-flat major, the starting note already has an accidental. Keep it in the name and at the octave. Write B-flat–C–D–E–F–G–A–B-flat. The D-to-E gap needs to be half, so change E to E-flat. The final list is B-flat–C–D–E-flat–F–G–A–B-flat.
A frequent mistake is to start on B-flat but end on B natural. Check the two endpoints before examining the middle. They should be the same named note an octave apart. Starting correctly does not excuse an inconsistent final note; the last gap is part of the pattern too.
Major scale notes: a reference for twelve common starting pitches
The table chooses one common spelling for each of the twelve pitch classes available within an equal-tempered piano octave. It is not a claim that only twelve written major key names exist. Enharmonic spellings such as F-sharp major and G-flat major use the same keys but different note names and key signatures.
| Major scale | Notes, including the octave return |
|---|---|
| C | C – D – E – F – G – A – B – C |
| D-flat | D-flat – E-flat – F – G-flat – A-flat – B-flat – C – D-flat |
| D | D – E – F-sharp – G – A – B – C-sharp – D |
| E-flat | E-flat – F – G – A-flat – B-flat – C – D – E-flat |
| E | E – F-sharp – G-sharp – A – B – C-sharp – D-sharp – E |
| F | F – G – A – B-flat – C – D – E – F |
| F-sharp | F-sharp – G-sharp – A-sharp – B – C-sharp – D-sharp – E-sharp – F-sharp |
| G | G – A – B – C – D – E – F-sharp – G |
| A-flat | A-flat – B-flat – C – D-flat – E-flat – F – G – A-flat |
| A | A – B – C-sharp – D – E – F-sharp – G-sharp – A |
| B-flat | B-flat – C – D – E-flat – F – G – A – B-flat |
| B | B – C-sharp – D-sharp – E – F-sharp – G-sharp – A-sharp – B |
Use the chart to check your own work rather than reading every row aloud repeatedly. Cover a row, write its letter framework, apply the formula and then compare. If the result differs, inspect one gap at a time. This tells you whether the issue is a missed accidental, a letter-name choice or the direction of the calculation.
For an additional spelling challenge, compare D-flat major with C-sharp major. The latter is C-sharp–D-sharp–E-sharp–F-sharp–G-sharp–A-sharp–B-sharp–C-sharp. On the piano, E-sharp uses the F key and B-sharp uses the C key. The sounds coincide with D-flat major’s keys, but the written explanation follows a different starting letter.
Scale degrees describe a position, not a permanent note name
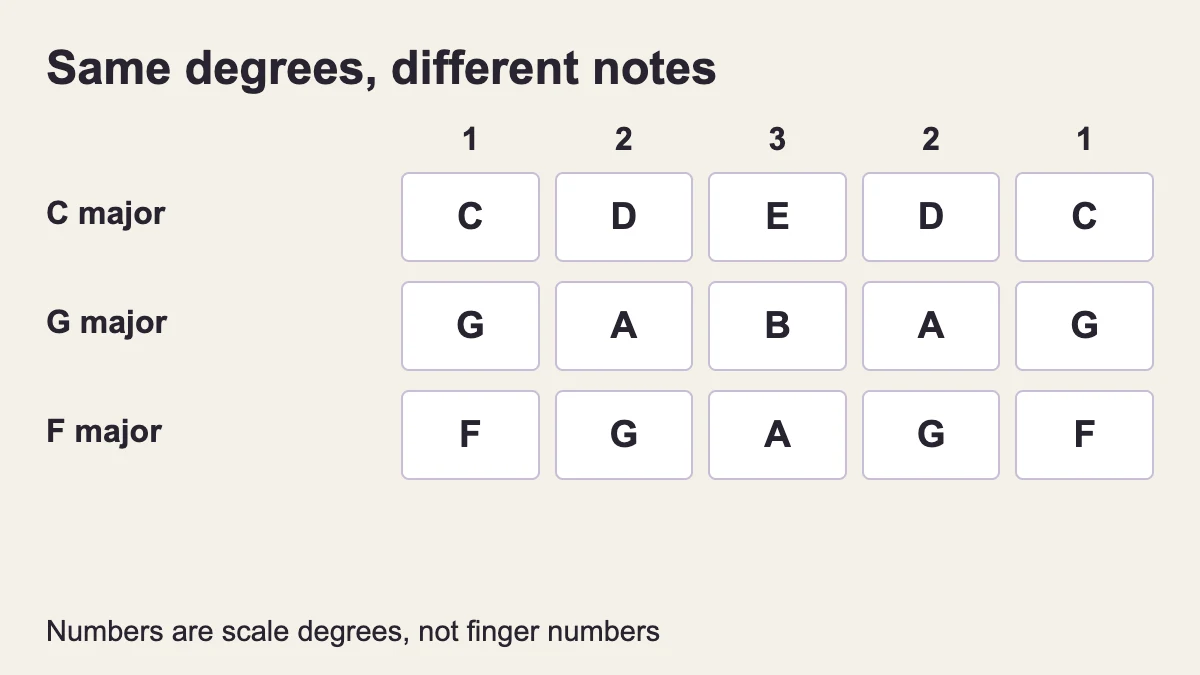
Degree one is the starting note, or tonic. In C major it is C; in G major it is G; in F major it is F. Degree three is E, B or A respectively. When you write an exercise as 1–2–3–2–1, you describe relationships that can move to another key without keeping the same letter names.
| Scale | 1–2–3–2–1 | Final note |
|---|---|---|
| C major | C–D–E–D–C | C |
| G major | G–A–B–A–G | G |
| F major | F–G–A–G–F | F |
Do not confuse degree numbers with finger numbers. The third scale degree does not necessarily use finger three. A finger number describes a physical choice; a degree describes a note’s relationship to the tonic. If you write both in a practice notebook, label the two systems explicitly rather than putting unexplained numbers above a melody.
Solfège also has more than one convention. In movable-do teaching, do can represent the tonic of different major keys. In fixed-do usage, syllables serve as note names. This page uses letter names and numbered degrees so you can see the intended relationship without assuming that every reader uses the same solfège system.
A key signature saves repeated writing; it does not replace listening
A key signature places recurring sharps or flats near the beginning of a staff. G major uses one sharp, F-sharp; F major uses one flat, B-flat. Within ordinary notation conventions, the signature applies to those note names across the staff unless a later accidental or signature change alters the instruction.
Knowing the signature helps you read, but it does not mean every note in a piece must belong to the major scale. Music can use chromatic notes, borrowed chords or changes of key. Nor does a signature by itself prove that a piece is major: a relative minor key shares that signature.
For example, C major and A minor both use a signature with no sharps or flats. Their tonal centres are not the same. Listen for points of arrival and examine the musical context instead of naming the key from the first note alone. Learning a scale provides a useful vocabulary, not a rule that removes the need to interpret music.
Practise descending without accidentally changing the scale
Reverse the finished ascending list. G major descends G–F-sharp–E–D–C–B–A–G. The F-sharp does not disappear because you are moving downward. In this descending direction, the first gap is half, followed by three whole gaps, then half and two whole gaps.
Before playing, point to the two half-step pairs: G/F-sharp and C/B in that descending list. They correspond to the same neighbouring pitches you checked on the way up. This prevents a common confusion: remembering the spoken ascending formula so strongly that you apply it in the wrong direction.
Try stopping halfway and restarting from a written note. If you can only descend after immediately ascending, you may be relying on the just-completed movement rather than knowing the note sequence independently. A short restart task checks that dependency without requiring a longer or faster scale.
Turn a scale into several different learning tasks
Repeatedly running from bottom to top can become automatic before you understand the notes. Keep that task, but add alternatives with clear purposes. The following exercises were prepared for this guide; they are not excerpts from a named piece or a graded examination requirement.
Task one: locate the half steps
Choose one scale and play only degrees 3–4 and 7–8. For D major, these pairs are F-sharp–G and C-sharp–D. Say the letters before playing. Then insert the missing notes around them. Your aim is to identify the structure that distinguishes the scale, not to perform the complete run as quickly as possible.
Task two: move a short pattern to a new tonic
Play 1–3–2–4–3–2–1 in C major: C–E–D–F–E–D–C. Move the same degree pattern to G major: G–B–A–C–B–A–G. Now try D major, where the third degree needs F-sharp. Writing the answers first makes the exercise about relationships rather than a rushed search for keys.
Task three: leave a gap and hear the destination
Play degrees 1–2–3, pause for a planned count, then play 4–3–2–1. Keep the pause the same length each time. During it, imagine the next note rather than filling the silence with extra sound. If imagining pitch is difficult, shorten the pause and compare the target after playing; the task should provide feedback, not a pass/fail label.
Task four: change rhythm while keeping the same notes
Take the five-note pattern 1–2–3–2–1. First play evenly. Next hold the third note longer while preserving a planned count. Finally return to even notes. You are changing rhythm, not constructing another scale. Keeping one dimension fixed helps you hear which part of the exercise actually changed.
Fingerings are a separate decision
The major scale formula tells you which pitches belong, not which fingers must play them. A familiar right-hand C major fingering for one ascending octave is 1–2–3–1–2–3–4–5. That example does not automatically fit every starting note, every instrument or every musical passage.
Before practising on a physical instrument, choose a suitable fingering and check the transition slowly. Avoid turning a theoretical note exercise into a forced stretch. A teacher can help adapt the movement to the instrument and the player. A web keyboard does not observe posture or diagnose technical problems.
If your instrument is a melodica, use the melodica fingering guide for the distinction between a five-note position and an octave pattern. The major scale’s notes remain relevant, while breath, touch and physical hand placement require their own attention. Do not mistake a computer shortcut for a physical finger number.
Use a metronome to answer a specific timing question
First decide what each click represents. For an initial task, play one note per click at a pace that leaves you time to prepare. The metronome supplies the reference; it does not decide whether your note spelling or fingering is correct. Verify those separately before drawing conclusions about timing.
If one transition repeatedly arrives late, practise the notes around it rather than speeding through the easy section. For example, isolate E–F–G in a C major pattern if the thumb change there interrupts the pulse. On an actual instrument, check the chosen technique with appropriate instruction instead of compensating by pressing harder.
Two notes per click is a different coordination task, not simply “the same scale but twice as good.” Keep the subdivision even and state what your tempo number refers to. Without that information, comparing yesterday’s BPM with today’s can be misleading. A practice record should describe both speed and note placement.
Connect the scale to chords and listening
For keyboard placement and chord symbols, the piano chord chart and inversion guide provides a separate practical reference. Here the goal is to connect scale degrees with the notes used to construct those chords.
Take degrees 1, 3 and 5 of C major: C–E–G. They form a C major triad. Do the same in G major and you obtain G–B–D. This is one useful bridge between a scale and an accompaniment. It does not mean every chord built from the scale’s notes is major.
For example, degrees 2, 4 and 6 of C major give D–F–A, a D minor triad. Building on different degrees creates different interval structures even when all the notes come from one major scale. Check the distances rather than assuming the word “major” describes every smaller group inside it.
To connect theory with your ear, compare 1–3 with 1–4 and 1–5. Keep the starting note stable, then change it and repeat the relationships. The interval ear-training exercise offers a short listening check. Its result describes those examples, not a fixed limit on what you can learn.
Keep a record that identifies the next problem
A useful note might read: “F major: B-flat remembered ascending, B natural played once descending; restart on C next time.” This is more actionable than “scales difficult.” It identifies the scale, direction and specific error, giving you a small task for the next session.
Separate four questions in your record: could you write the notes, locate the keys, keep the timing and recognise the sound? You might answer yes to two and not yet to the others. That is not a contradiction. These are related skills with different demands, and a well-chosen exercise can target one without pretending to assess them all.
When a task becomes comfortable, change one condition: another tonic, descending order, a different starting degree or a short written pattern. Avoid changing everything at once. You want to know whether the relationship transfers, not simply create a challenge so complicated that every error has several possible causes.
Find the error: worked questions
1. Is G–A–B–C–D–E–F–G a G major scale? No. F must become F-sharp. The unaltered E-to-F gap is half instead of whole, and F-to-G is whole instead of half.
2. Why not write A-sharp in F major? The fourth degree needs a kind of B. B-flat preserves the letter sequence F–G–A–B–C–D–E. A-sharp reaches the same piano key but gives a misleading scale spelling.
3. What is degree three in D major? F-sharp. It is not automatically E because E is the third degree of C major. Degree numbers move with the tonic.
4. Does a major scale lose its sharps when descending? No. Reverse the finished note list. D major still contains F-sharp and C-sharp on the way down.
5. Are seven different notes and eight played notes contradictory? No. A one-octave scale repeats the starting note at the top. There are seven pitch classes before that octave return.
6. Does knowing a key signature identify every chord in a piece? No. It provides a starting notation context. Actual notes, chromatic alterations and musical function still need attention.
Choose the next step from what you actually need
If finding neighbouring keys is still slow, review sharps and flats before adding more scale names. If the note list is clear but the sound is not, use short degree patterns and interval comparisons. If movement is the difficulty, work with suitable instrumental guidance rather than collecting more theoretical charts.
A scale becomes useful when you can build it, recognise its relationships and apply a small part of it deliberately. Memorising all the rows is not the only route to that result. Keep the reference available, check your reasoning and let the next exercise address the specific uncertainty you discovered.
References and original materials
The scale definition and degree terminology were checked with Open Music Theory: Major Scales. For a separate instructional reference, see Toby Rush’s major-scale explanation. The calculated chart, diagrams, diagnostic examples and practice tasks here were created for KulakApp; no source worksheet, composition or recording is reproduced.