How to Read Guitar Chord Diagrams
Short answer: a guitar chord diagram is a compact map of the fretboard. The six vertical lines represent the six strings, the horizontal lines represent fret boundaries, and dots show where to place your fingers. Locate low E on the left and high E on the right in a standard upright diagram, check the chord name and the string symbols above it, then strum only the strings marked to sound. With that convention in mind, even a first-time guitarist can turn a chord chart into a playable shape.
Guitar chord diagrams, also called chord charts or chord boxes, can look like small grids full of unfamiliar symbols. The good news is that the diagram is not a code you have to memorise. It is a visual snapshot of the neck: it tells you which strings to play, which frets to hold, which fingers are suggested, and which strings should remain open or silent. This beginner guide explains how to read chord diagrams accurately, how to avoid orientation mistakes, and how to practise common open chords without building unnecessary tension.
What is a guitar chord diagram?
A guitar chord diagram is a top-to-bottom or front-facing drawing of a small section of the fretboard. It represents a chord shape rather than a sequence of notes. When you see a C major diagram, for example, the chart gives you one comfortable arrangement of C, E, and G notes on the strings. It does not mean that C major exists in only one position. The same chord name can have many voicings, inversions, and shapes higher up the neck.
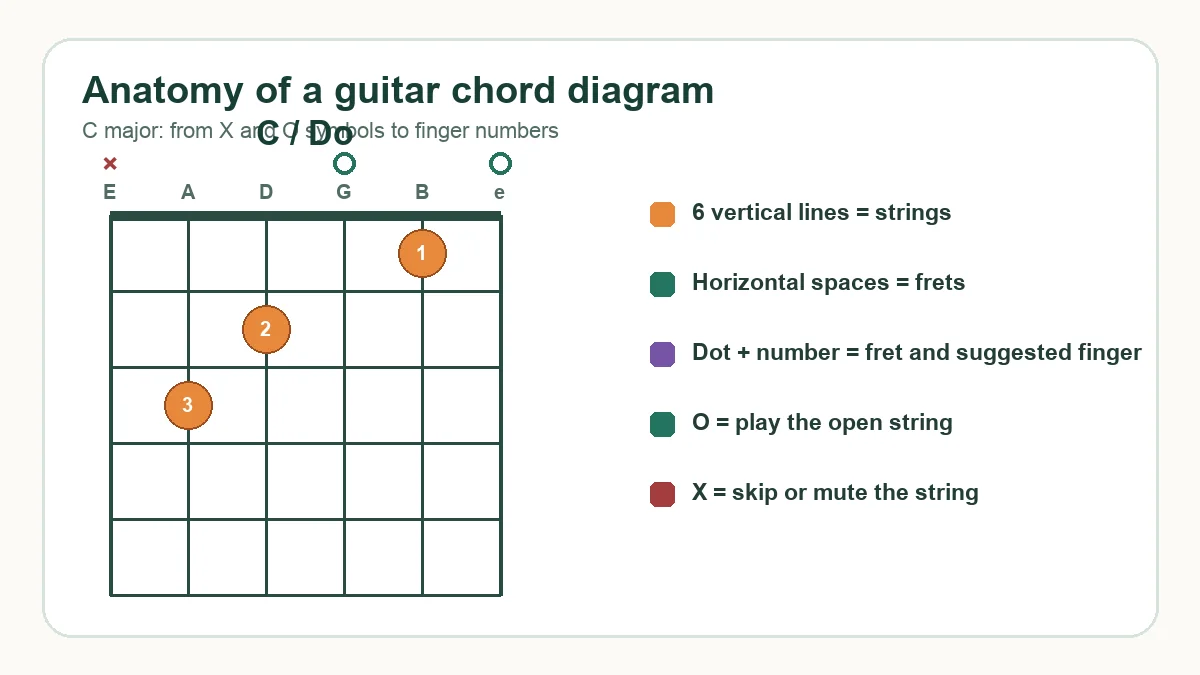
| Visual element | What it represents | What you do |
|---|---|---|
| Six vertical lines | The six strings | Match each line to a string before placing your fingers. |
| Horizontal lines | Fret boundaries | Place a fingertip in the space just behind the required fret. |
| Filled dot | A fretted note | Press that string at the indicated fret. |
| Open-circle O | An open string | Play the string without pressing a fret. |
| X | A muted or unused string | Do not let that string make a pitched sound. |
| Nut or heavy top line | The nut at the headstock end | Use it to identify the first-position area. |
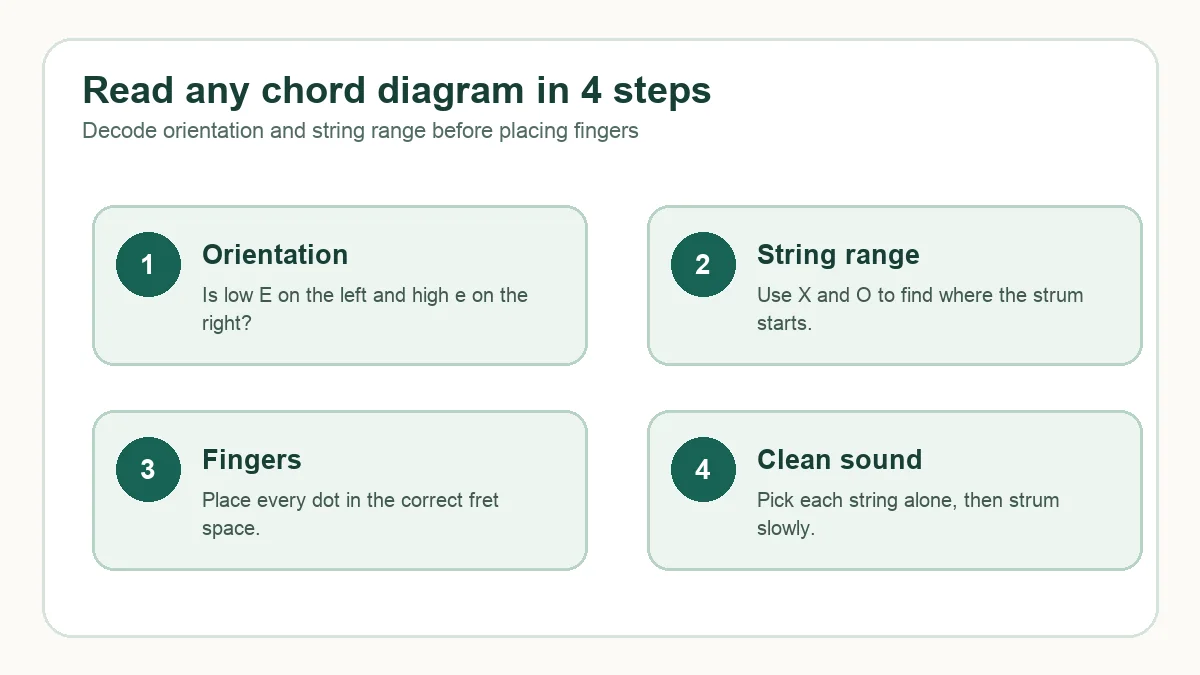
A diagram is usually read before you look at the written chord name. First identify the string order and the fret range. Then check the marks above the grid, count the dots, and finally compare the suggested fingering with the shape you are making. That sequence prevents a common error: memorising a hand position while accidentally strumming a muted string.
How to read the orientation of a chord chart
Read a standard upright chord diagram as a schematic front view of the guitar neck. The low E string is on the left, followed by A, D, G, B, and high E on the right. The high E is therefore the rightmost vertical line. The nut is normally the thick horizontal line at the top. This makes the chart resemble the neck as you hold the guitar upright in front of you, with the headstock above the fretting hand.
That convention is common, but it is not universal. A mirrored left-handed chart can reverse the string order; this is different from the standard front-view diagram. Some websites show a horizontal neck, and some left-handed resources mirror the chart. A diagram may also omit the nut and label the starting fret with a number. Never infer orientation from the chord name alone. Find the low E and high E labels, a left/right-handed notice, or the starting-fret number first.
| Chart style | How the strings may appear | How to verify it |
|---|---|---|
| Standard upright diagram | Low E left, high E right | Check the string labels or the chord legend. |
| Mirrored left-handed diagram | High E left, low E right | Look for a left-handed label or reversed E labels. |
| Horizontal neck | Strings run across the page | Find the nut, fret numbers, and string labels. |
| Movable-neck chart | Nut may be absent | Read the printed starting fret beside the grid. |
Do not confuse the visual orientation of a diagram with the order in which you name strings. Guitarists normally number strings from the thinnest, highest-sounding string as first string to the thickest, lowest-sounding string as sixth string. In standard tuning, those strings are E, B, G, D, A, and E from first to sixth. A chart can be displayed in either direction while the string numbers stay the same.
Dots, frets, open strings, muted strings, and barre lines
Dots show fretted notes
A filled dot inside a fret space tells you to press that string at that fret. The dot is placed between two horizontal fret lines, not directly on a metal fret. For a first-position chord, the space immediately below the nut is the first fret. Put the fingertip close to the fret wire on the body side, but do not cover the wire itself. This produces a clean note with less pressure than squeezing the string in the middle of the space.
Open strings are not “nothing”
An open-circle O above a string means that the string is part of the chord and should ring without a left-hand finger. Beginners sometimes mute an open string because they think every string needs a dot. Do the opposite: keep the fretting hand away from the string, and make sure another finger is not leaning across it. Open strings often give beginner chords their full, resonant sound.
X means silent, not a wrong note
An X above a string means that you should not allow a clear pitch from that string. Depending on the rhythm, you may skip the string or touch it lightly to create a muted percussive sound. A missed string and a muted string are not identical: a missed string is not struck, while a muted string may be struck but should not ring as a pitched note. When learning a strumming pattern, first practise the correct string range slowly.
Barre lines cover several strings
A thick, curved, or straight line across multiple strings indicates a barre. One finger, usually the index finger, presses several strings at the same fret. A small number near the line may identify the finger that forms the barre. The line does not mean that you should press on top of the metal fret. It marks a shared fretting action across the fret space.
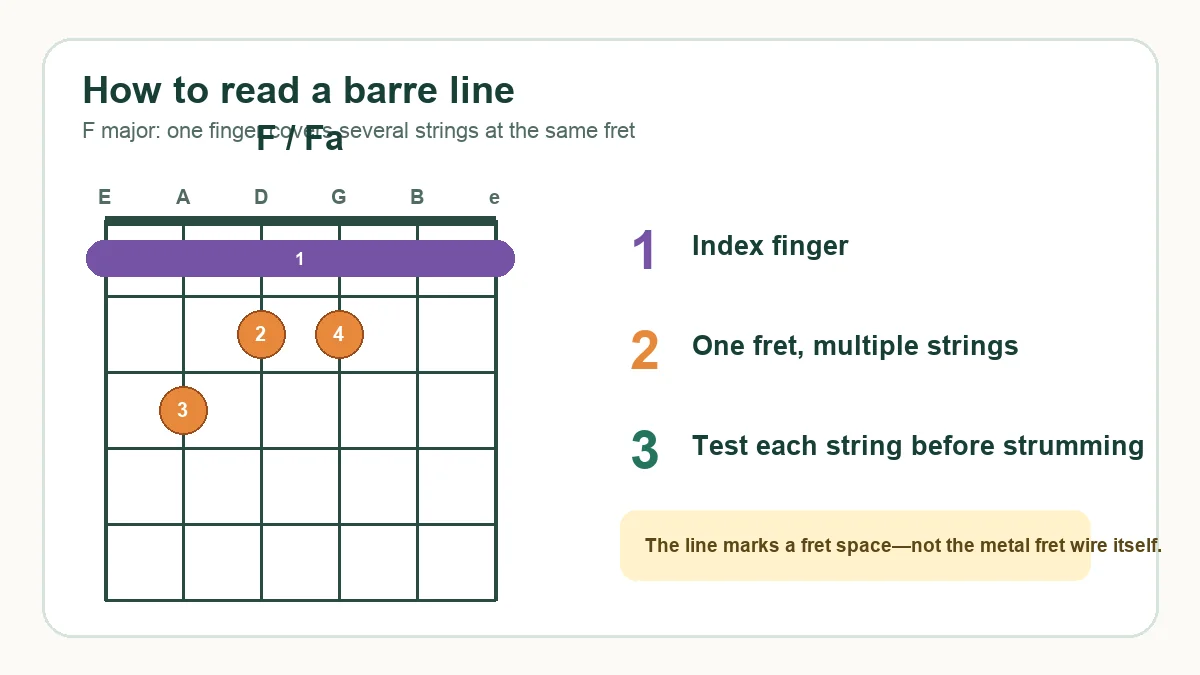
Some charts use a small curved line from one dot to another instead of a full bar. That can be a partial barre: use one finger to cover only the marked strings. If the diagram includes a number such as “V” beside the grid, the chord begins at the fifth fret. In movable shapes, the Roman numeral or fret number is essential because the same pattern changes chord name when it moves.
Finger numbers, chord names, and chord shapes
Most chord diagrams label the fretting-hand fingers with numbers: 1 is the index finger, 2 is the middle finger, 3 is the ring finger, and 4 is the little finger. The thumb is not numbered in a standard chord chart. Finger numbers are instructions or suggestions, not part of the chord’s identity. A different fingering may work if it produces the same notes and leaves a practical route to the next chord.
| Number | Finger | Beginner reminder |
|---|---|---|
| 1 | Index | Often handles the first-position notes or a barre. |
| 2 | Middle | Keep its knuckle rounded so nearby strings stay clear. |
| 3 | Ring | Place it independently rather than collapsing the wrist. |
| 4 | Little finger | Use only when marked or when it improves the next transition. |
The chord name describes the harmony: C major, A minor, D7, and so on. The shape describes one physical way to produce that harmony on a guitar. A single chord name can have several shapes, and one movable shape can produce different chord names at different frets. This distinction matters when a song chart gives you “G” but the diagram shows a version of G that is different from the first one you learned. Both can be correct if their notes and function match.
Symbols in the name also matter. “m” means minor, “7” adds a dominant seventh, “maj7” indicates a major seventh, “sus2” or “sus4” replaces the third, and “add9” adds a ninth without necessarily changing the basic triad. Do not use a plain major shape when the diagram explicitly says minor or seventh. The shape and the name must agree.
Common beginner guitar chords
Open-position chords are a good starting point because they combine fretted and open strings. The goal is not to collect dozens of shapes immediately. Learn a small group that appears often, then practise moving between pairs. C, G, D, A, E, Em, Am, and Dm cover many beginner songs and make the relationship between chord names and shapes easier to hear.
| Chord | Quality | What to watch for |
|---|---|---|
| C | Major | Usually strum from the A string; keep the low E silent. |
| G | Major | Several fingerings exist; check which version the song uses. |
| D | Major | Often starts at the D string; avoid the two lowest strings. |
| A | Major | Three notes share the second fret; keep the high E clear. |
| E | Major | All six strings may sound if every note is clean. |
| Em | Minor | Simple two-finger shape; all six strings commonly ring. |
| Am | Minor | Start from the A string and avoid the low E. |
| Dm | Minor | Usually starts at the D string; keep the low strings quiet. |
These are families, not rigid hand poses. For example, a G chord may be shown with a three-finger version, a four-finger version, or a voicing that prepares a C chord. Copy the chart in front of you, especially when a transition depends on a particular finger staying near the same fret.
To hear how chord qualities differ, you can compare the notes with KulakApp’s chord ear training. To explore the fretboard before holding a physical guitar, use the virtual guitar. These tools complement diagram reading: the chart explains where, while your ear confirms what the shape sounds like.
Interactive chord diagram decoder
Choose a chord. The diagram and its plain-language reading update together. This tool uses standard E–A–D–G–B–E tuning.
C majorC major: mute the low E string; fret A at 3, D at 2 and B at 1. Let G and high E ring open.
Chord diagram, guitar tab, and song chord sheet: what is the difference?
A chord diagram is a snapshot of one fretting-hand shape. Guitar tablature is a timeline: numbers appear in the order you play them. A song chord sheet is a map of harmony, usually placing chord names above lyrics or measures. If you only need to form C major, use a diagram. If you need the exact riff, use tab. If you need to accompany a song, use a chord sheet and consult a diagram whenever a shape is unfamiliar.
Confusing these formats creates avoidable frustration. A chord diagram does not tell you how long to hold the chord, which strumming pattern to use, or when to change. Add a metronome and count the beats separately. Conversely, tab can show individual notes without explaining the chord those notes imply. Learning the job of each format lets you choose the right tool instead of expecting one picture to answer every musical question.
What changes when a capo is used?
A capo shortens every string and raises the sounding pitch. Most song sheets still name the familiar shape you should hold, while some name the concert pitch that listeners hear. Check the chart legend. “Capo 2, play G” normally means hold a G shape two frets higher; the sounding chord is A. The chord diagram itself is read in the usual way unless it displays an explicit fret number beside the grid.
How to read diagrams above the first fret
When a chart begins at fret 3, 5, or another higher position, a small number appears beside the first visible fret. That number is the location of the top row, not a finger number. Move the entire shape to that position. A thick top line usually represents the nut only when the chart begins at fret 1.
Left-handed and mirrored chord diagrams
Some left-handed resources mirror the string order so the thick low E appears on the right. Others keep the conventional diagram and ask the player to translate it. Neither system changes the chord’s notes, but switching conventions mid-practice is confusing. Read the string labels before placing a finger. If labels are missing, compare the diagram with its tuning row and chord spelling.
A practical rule is to choose one display convention for daily work. Use mirrored charts if they make the relationship between the page and your instrument immediate; use standard charts if most of your books, teachers, or bandmates use them. Musical accuracy matters more than the visual convention.
Reference notes
The notation conventions in this guide follow common teaching practice described in Fender’s chord-chart guide and Yamaha’s beginner guitar materials. Publishers can vary, so always read a chart’s legend when its symbols differ. KulakApp’s diagrams and explanations are original teaching materials rather than copies of third-party charts.
Frequently asked questions
Which way up should I read a guitar chord diagram?
Usually the nut is at the top, the low E string is on the left, and the high E string is on the right in a standard upright diagram. Check the labels because some charts are mirrored or horizontal.
What do the six vertical lines mean?
They represent the six guitar strings. In the common upright layout, the leftmost line is the low E string and the rightmost line is the high E string.
What does O mean above a chord chart?
O means the string is open. Play it without pressing any fret, while making sure nearby fingers do not touch it.
What does X mean on a guitar chord diagram?
X means the string should not produce a clear pitched note. Skip it or mute it lightly, depending on the rhythm.
Do chord diagrams show the chord name or the exact shape?
They show a particular playable shape and usually label its chord name. One chord name can have several shapes, so the diagram is one voicing rather than the only possible form.
Do the finger numbers have to be followed exactly?
They are useful recommendations, especially for beginners and transitions, but another fingering can be valid if all required notes ring and the next movement remains comfortable.
Why does my chord diagram look reversed?
Resources may use a standard upright diagram, a horizontal neck, or a left-handed mirror. Find the low E and high E labels and follow the resource’s stated convention rather than guessing from the page.
How long does it take to learn common guitar chords?
Many beginners can form a few open chords in a short period, but clean sound and reliable transitions take repeated practice. Progress depends on practice quality, instrument setup, hand comfort, and the number of shapes studied at once.
Build a chord progression to practise → Learn how chord shapes move between keys →